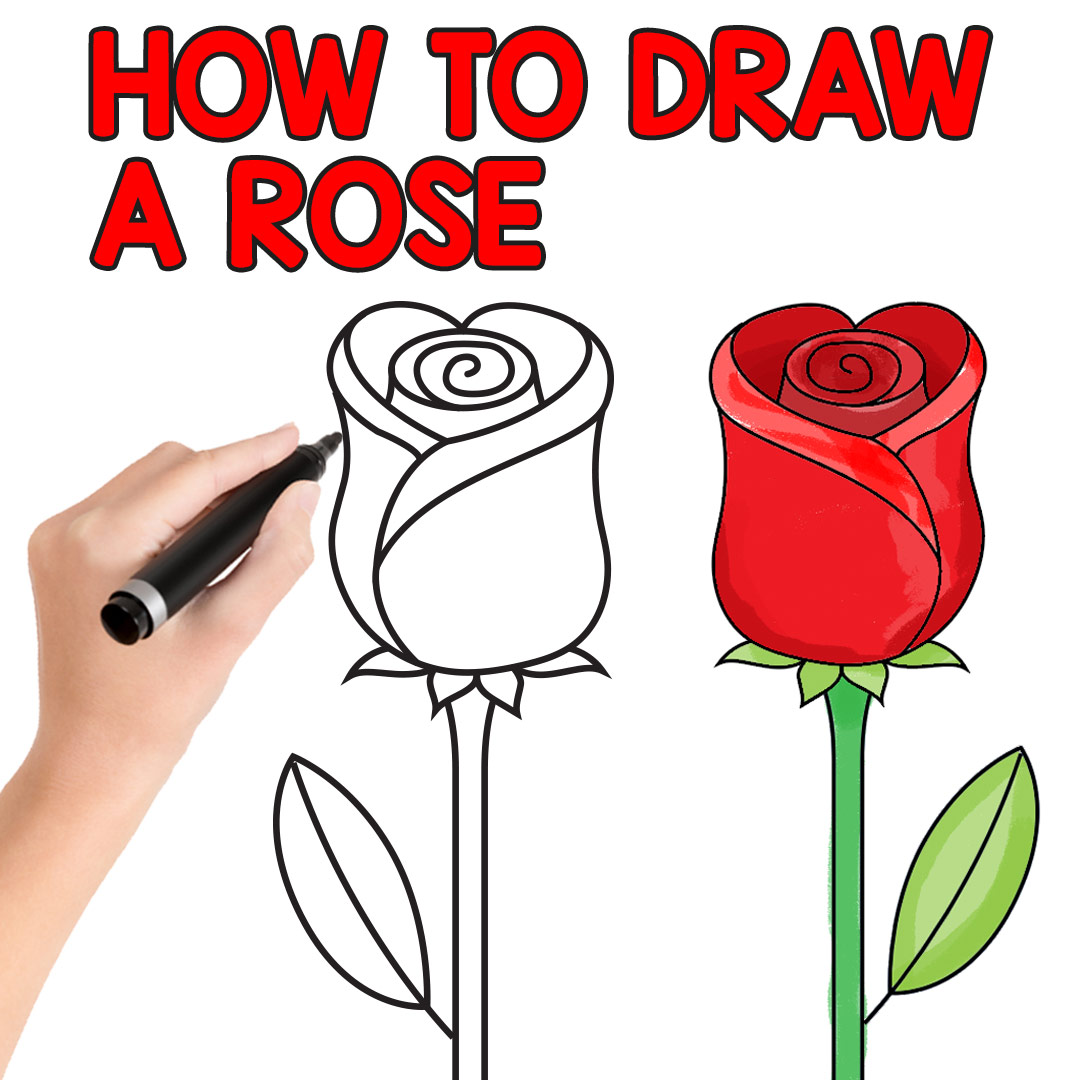
How To Draw A Rose: Easy Steps For Beginners To Realistic Art
Roses are often referred to as the symbol of romance and love. They are beautiful and breathtaking to look at, gracing gardens and bouquets with their delicate petals and vibrant hues. Whether you're looking for the perfect handmade gift for Valentine's Day or Mother's Day, or simply want to explore your artistic side, learning how to draw a rose is a wonderfully rewarding endeavor.
However, for many, the idea of drawing such an intricate flower can seem like a daunting task. Learning how to draw a rose can be intimidating for beginners, with its many layers and organic shapes. But what if we told you it doesn't have to be? What if you could create a beautiful rose sketch with just a few simple steps?
Today, we're embarking on a creative journey to learn how to draw a rose. This how-to-draw-a-rose step-by-step tutorial makes drawing this beautiful flower super easy, making it perfect for beginners as well as kids. Ready to draw roses that impress? Let's dive in!
Why Draw a Rose? More Than Just a Flower
Beyond its aesthetic appeal, the rose holds deep symbolic meaning across cultures. It represents love, passion, beauty, and even new beginnings. This makes a hand-drawn rose an incredibly personal and heartfelt gift. Imagine presenting a loved one with a drawing you've created yourself – it carries so much more sentiment than a store-bought card.
As mentioned, this drawing is perfect for Valentine's Day and Mother's Day, but it's also wonderful for birthdays, anniversaries, or simply as a way to brighten someone's day. And the best part? If you don't have a green thumb, you can still create a rose on paper. You don't need a garden to cultivate this beauty; just a pencil and paper!
Getting Started: Your Essential Drawing Tools
You don't need an elaborate art studio to begin. The beauty of drawing a rose, especially for beginners, lies in its simplicity. Here's what you'll need:
- Pencil: A standard HB pencil is perfect for sketching. If you want to add shading, a softer B pencil (like 2B or 4B) can be useful.
- Paper: Any drawing paper will do. A sketchbook is great for practice.
- Eraser: Essential for correcting mistakes and refining your lines.
- Sharpener: Keep your pencil points sharp for precise lines.
This easy rose drawing tutorial focuses on how to draw a rose with pencil, allowing you to master the basic shapes and forms before venturing into colors.
The Journey to a Blooming Rose: Step-by-Step Guide
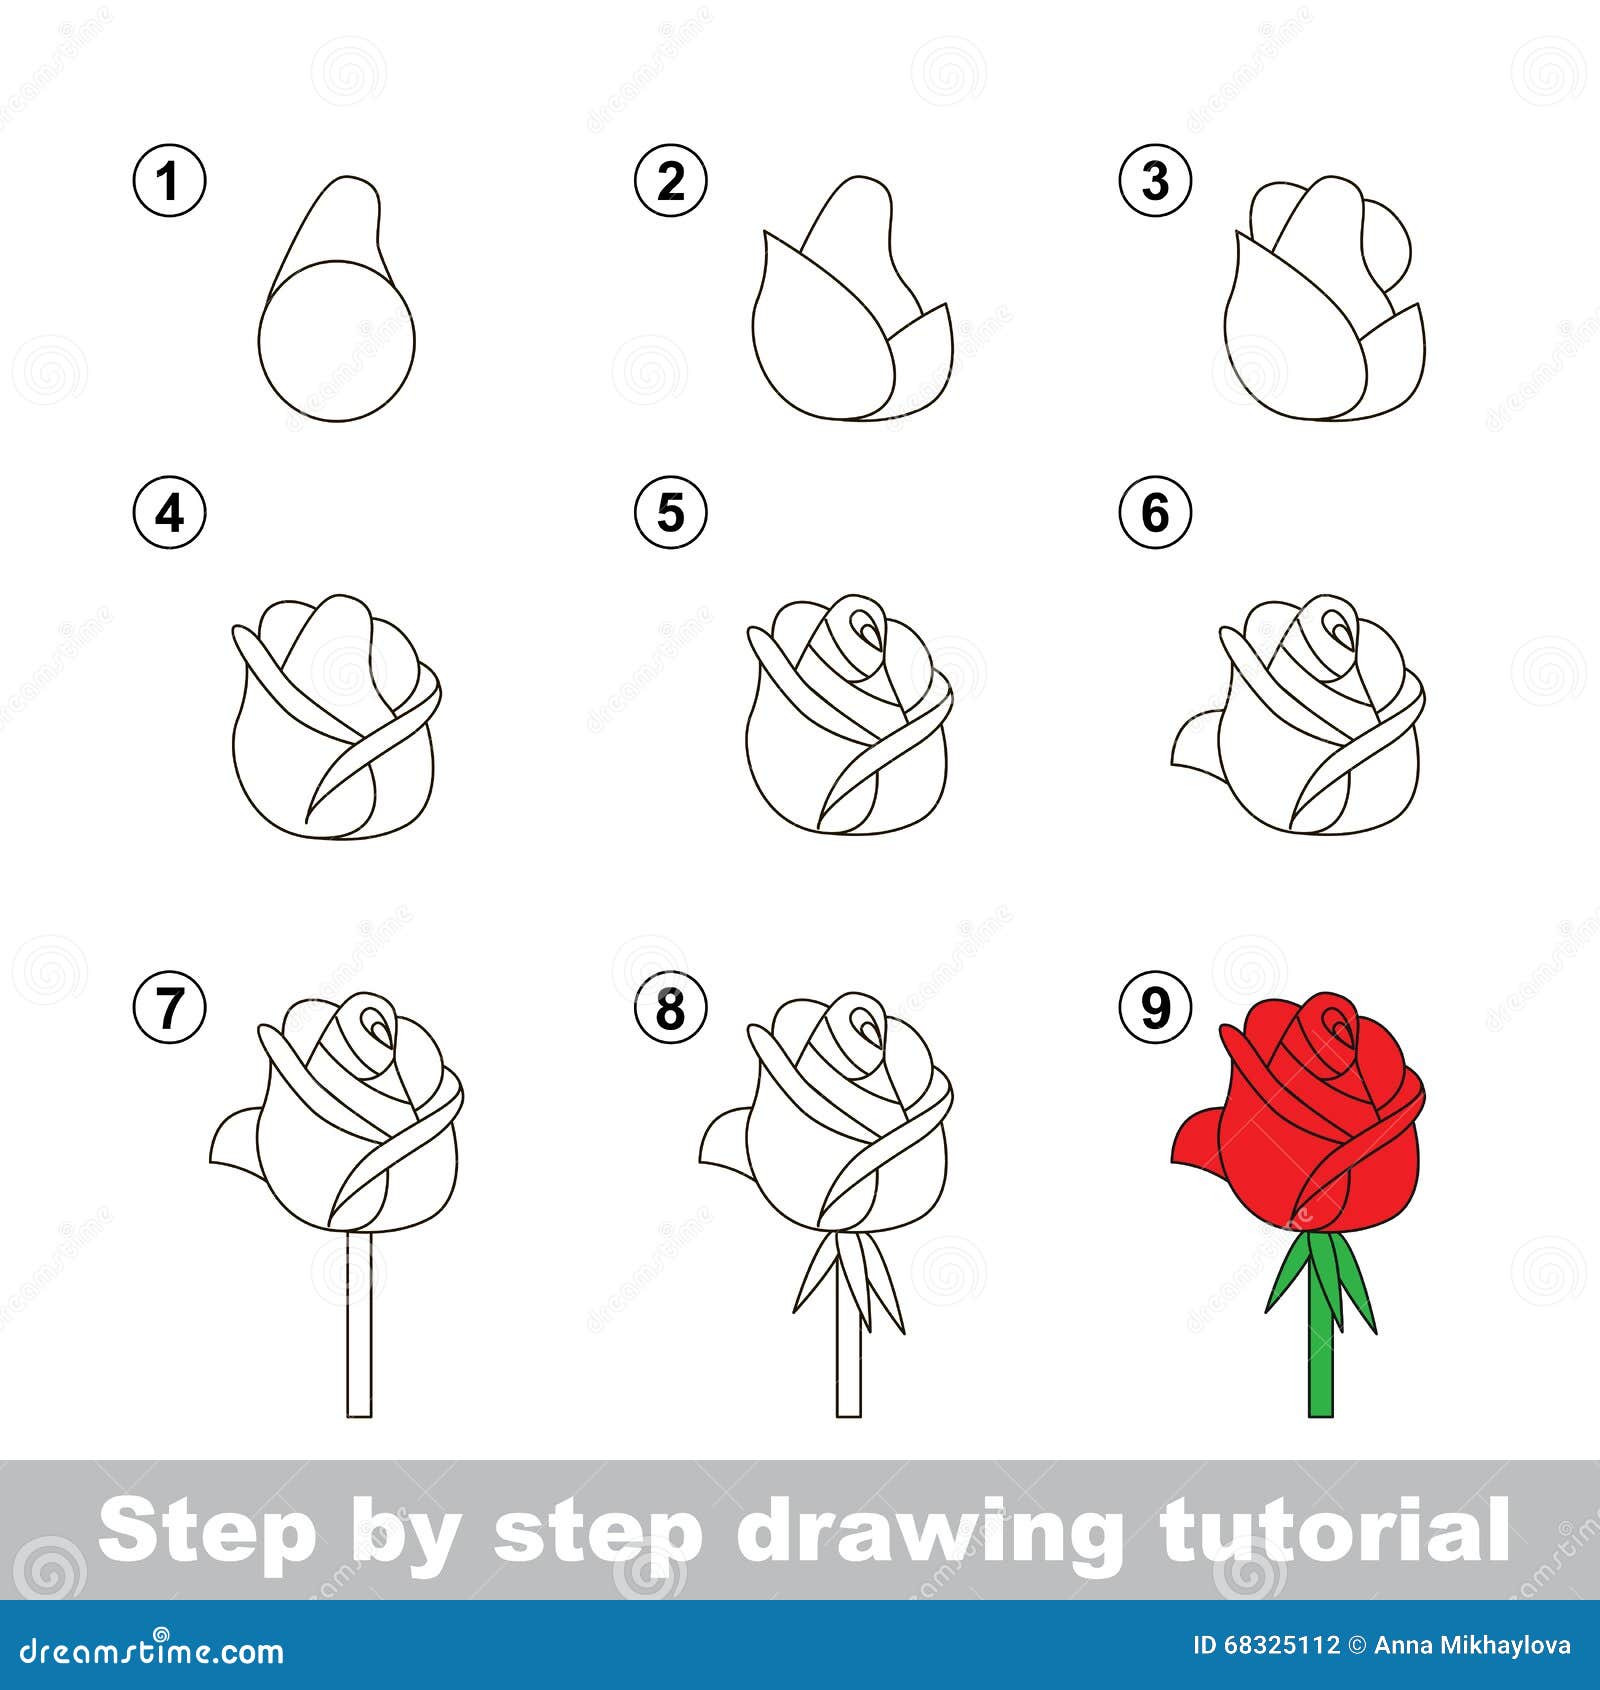
Drawing a rose can seem like a daunting task, but with a few simple steps, you can create a beautiful rose sketch. This tutorial explains how to draw a realistic rose step by steps with detailed pencil illustrations as examples for each step (though we'll describe them in detail here!). We'll learn how to draw a rose in 8 steps using these easy step-by-step instructions. Remember, these 8 drawing guides progress from easy designs to complex realism, perfect for artists at any level. We'll start with the foundational shapes and build up to a full bloom.
Step 1: The Central Bud - A Simple Spiral
Begin by drawing a small, loose spiral shape in the center of your paper. Think of it as the very core of the rose, where the petals are tightly wound. Don't press too hard; these are just guide lines. This spiral will be the starting point for all your subsequent petals, setting the foundation for the rose's iconic form.
Step 2: Enclosing the Bud with the First Petal
Around your spiral, draw a small, slightly curved "U" shape that partially encloses the spiral. This is your first visible petal, gently wrapping around the tightly wound center. This petal should appear to cup the spiral, giving the impression of the rose beginning to open.
Step 3: Adding More Inner Petals
Now, add two or three more small, overlapping "U" or "C" shapes around the first petal. These petals should also appear to cup the center, getting slightly larger as they move outwards. Vary their sizes and angles slightly to give a natural, organic look. Remember, no two petals are exactly alike in nature.
Step 4: Building the Main Body of the Rose
Expand outwards from your inner petals. Draw larger, more open "C" or "S" curves that extend from the base of the existing petals. These will form the main body of the rose. Think of them as broad, flowing shapes that define the overall cup-like structure of the flower. Allow some curves to overlap others, creating depth.
Step 5: Defining the Outer Petals
Continue adding larger, more expansive petals around the main body. These outer petals will be wider and more open, often with slightly wavy or ruffled edges. Some might even appear to fold back slightly. Pay attention to how they overlap and interact, creating a sense of volume and fullness. The final drawing will be a rose in full bloom, and these outer petals contribute significantly to that appearance.
Step 6: Adding the Sepals and Stem
Below the main body of the rose, draw the sepals – the small, leaf-like structures that protect the bud. These typically appear as pointy, elongated shapes extending downwards from the base of the flower. From the sepals, draw two slightly curved lines downwards to form the stem. Keep the stem relatively thin and natural-looking.
Step 7: Introducing Leaves
Roses are known for their distinctive leaves, which usually grow in groups of three or five leaflets on a single stem. Draw one or two branches off the main stem, and then add the individual leaflets. Rose leaves have serrated (toothed) edges, so add small zig-zags along their outlines. Don't forget to add a central vein and smaller veins branching off it for realism.
Step 8: Refining and Shading for Realism
Now comes the magic of bringing your rose to life! Erase any unnecessary guide lines. Go over your pencil lines to make them clearer and more confident. Then, use shading to add depth and dimension. Observe how light falls on a rose:
- Petals: Shade the areas where petals overlap or fold, creating shadows that make them appear to recede. The parts of the petals facing the light will be brighter.
- Center: The inner spiral will often be darker, as light struggles to reach it.
- Sepals & Stem: Add some shading to give them roundness.
- Leaves: Shade along the veins and edges to make them pop.
Tips for Success and Continued Growth
Whether you're a beginner or an experienced artist, this guide will help you. Here are some extra tips to enhance your rose drawing journey:
- Practice Makes Perfect: Don't get discouraged if your first rose isn't exactly what you envisioned. Drawing is a skill that improves with practice. Keep sketching!
- Observe Real Roses: If possible, look at a real rose or high-quality photographs. Notice how the petals curl, overlap, and catch the light. This observation is invaluable for realistic drawing.
- Vary Your Petals: Avoid drawing every petal exactly the same. Some can be slightly torn, some folded, some larger than others. This adds to the natural beauty.
- Experiment with Pressure: Use varying pencil pressure to create different line weights and shading intensities. Lighter lines for initial sketches, darker for outlines and deep shadows.
- Don't Fear Mistakes: Erasers are your friends! Drawing is a process of refinement.
- Perfect for kids, beginners, and toddlers interested in cute and easy drawings: This tutorial is designed to be accessible. Encourage young artists to try it too!
Conclusion
Drawing a rose, a timeless symbol of beauty and emotion, might have seemed like an insurmountable challenge at first. However, as we've explored, with a methodical approach and a few simple steps, anyone can create a stunning rendition of this beloved flower. From the initial spiral to the intricate shading of the petals and leaves, each stage builds upon the last, transforming basic shapes into a vibrant, realistic bloom.
In this article, we’ve taken you through a detailed process so you can confidently pick up your pencil and bring a rose to life. Whether you're aiming for a simple sketch or a detailed, shaded masterpiece, the foundation laid out here will serve you well. Remember, the journey of drawing is as rewarding as the final artwork itself. So, embrace the process, enjoy the creation, and let your artistic passion bloom!
How to Draw a Rose - Easy Step by Step For Beginners and Kids - Easy
How To Draw A Rose Step By Step Easy

How to Draw a Rose: A Step by Step Guide
