Master The Art Of Measurement: Your Ultimate Guide To Reading A Tape Measure
Whether you're a seasoned DIY enthusiast, a budding carpenter, or simply tackling basic home repairs, understanding how to accurately read a tape measure is a fundamental skill. It's not just about getting a number; it's about precision, confidence, and ensuring your projects turn out exactly as planned. While it might seem straightforward at first glance, a tape measure is packed with subtle markings and features that, once understood, can make your measuring quicker and far more accurate. This comprehensive guide will help you unlock tape measure features, decode its various markings, and teach you how to use a measuring tape like a pro.
The Fundamentals: Understanding Tape Measure Markings
Before you can confidently complete your project, you need to grasp what all those lines and numbers mean. Tape measures typically come in two main systems: imperial (inches and feet) and metric (centimeters and millimeters). Many modern tapes include both, allowing for versatility depending on your project's requirements. I use both measuring systems depending on what I'm working on, and knowing how to read both properly is a huge advantage.
Decoding the Imperial System (Inches and Fractions)
The imperial system, commonly used in the United States, relies on inches, which are further divided into fractions. This is where many people get tripped up, but it's actually quite logical once you understand the pattern. The easiest way is by understanding and learning what the 16 markings of an inch stand for.
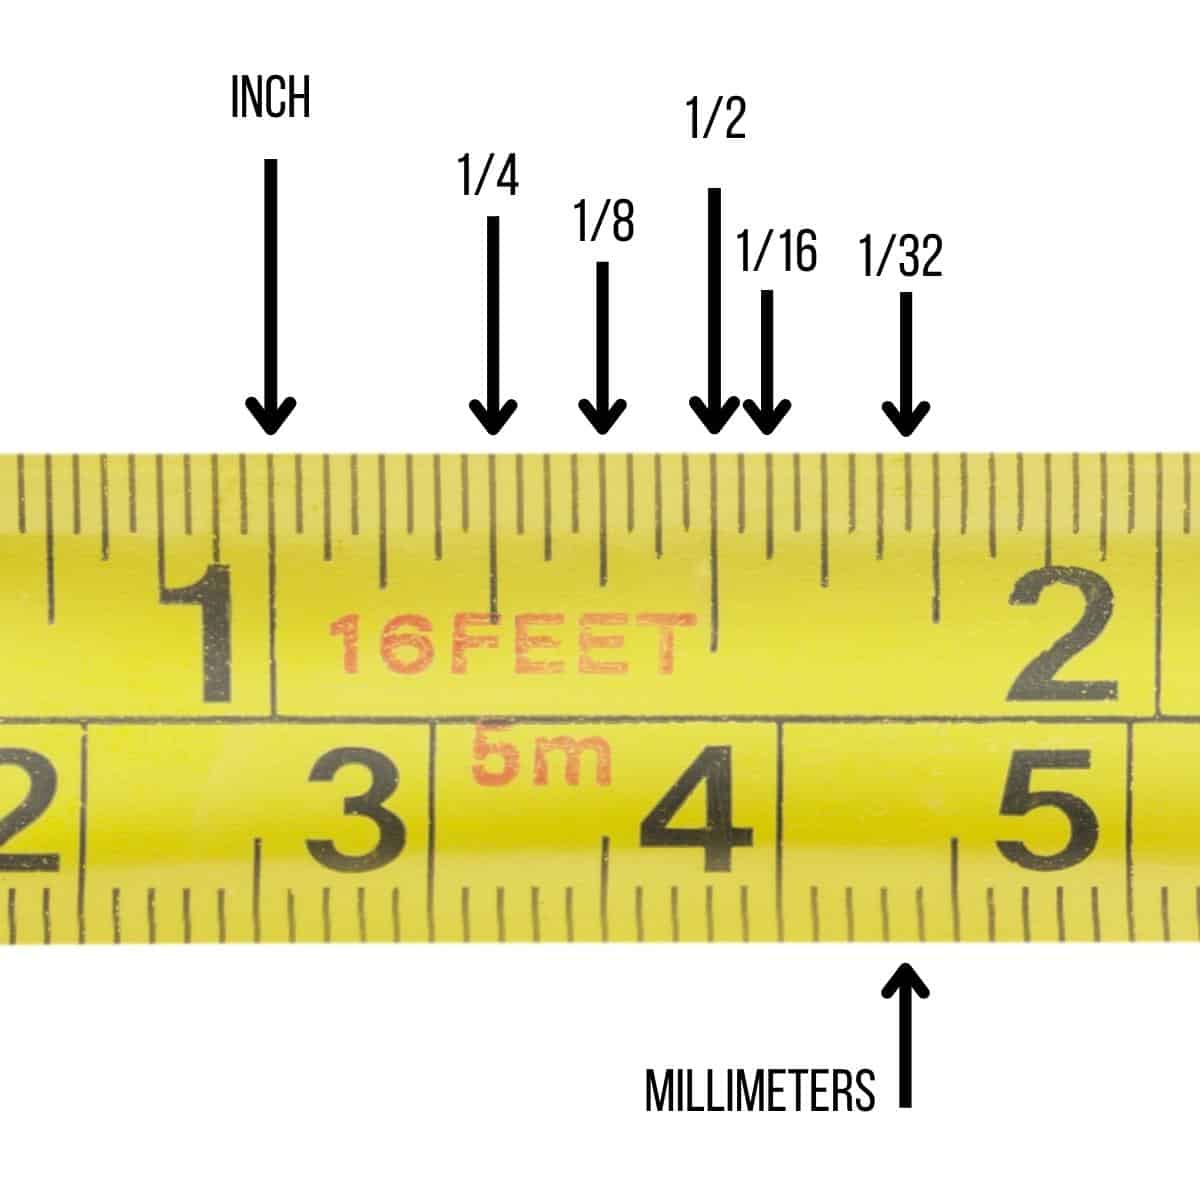
Let's break down an inch:
- Full Inch Marks: These are the longest lines, usually numbered (1, 2, 3, etc.). An inch mark has a full line. When you're reading a tape measure, you'll first find the number next to the large tick.
- Half-Inch Marks (1/2"): The next longest lines, typically found exactly halfway between two full inch marks.
- Quarter-Inch Marks (1/4"): These lines are shorter than the half-inch marks and divide each half-inch segment into two. You'll find them at 1/4", 1/2" (which is also 2/4"), 3/4", and then the next full inch.
- Eighth-Inch Marks (1/8"): Even shorter, these lines divide the quarter-inch segments. You'll see them at 1/8", 2/8" (1/4"), 3/8", 4/8" (1/2"), 5/8", 6/8" (3/4"), and 7/8".
- Sixteenth-Inch Marks (1/16"): These are the shortest lines on most standard tape measures, dividing the eighth-inch segments. Every small tick represents 1/16 of an inch.
To read an imperial measurement, you'll first identify the last full inch mark you passed. Then, you'll count the number of small ticks past it the measurement is. For example, if your measurement is past the 5-inch mark and lands on the third shortest tick after it, that would be 5 and 3/16 inches. You add the number next to the large tick with the fraction you've determined.
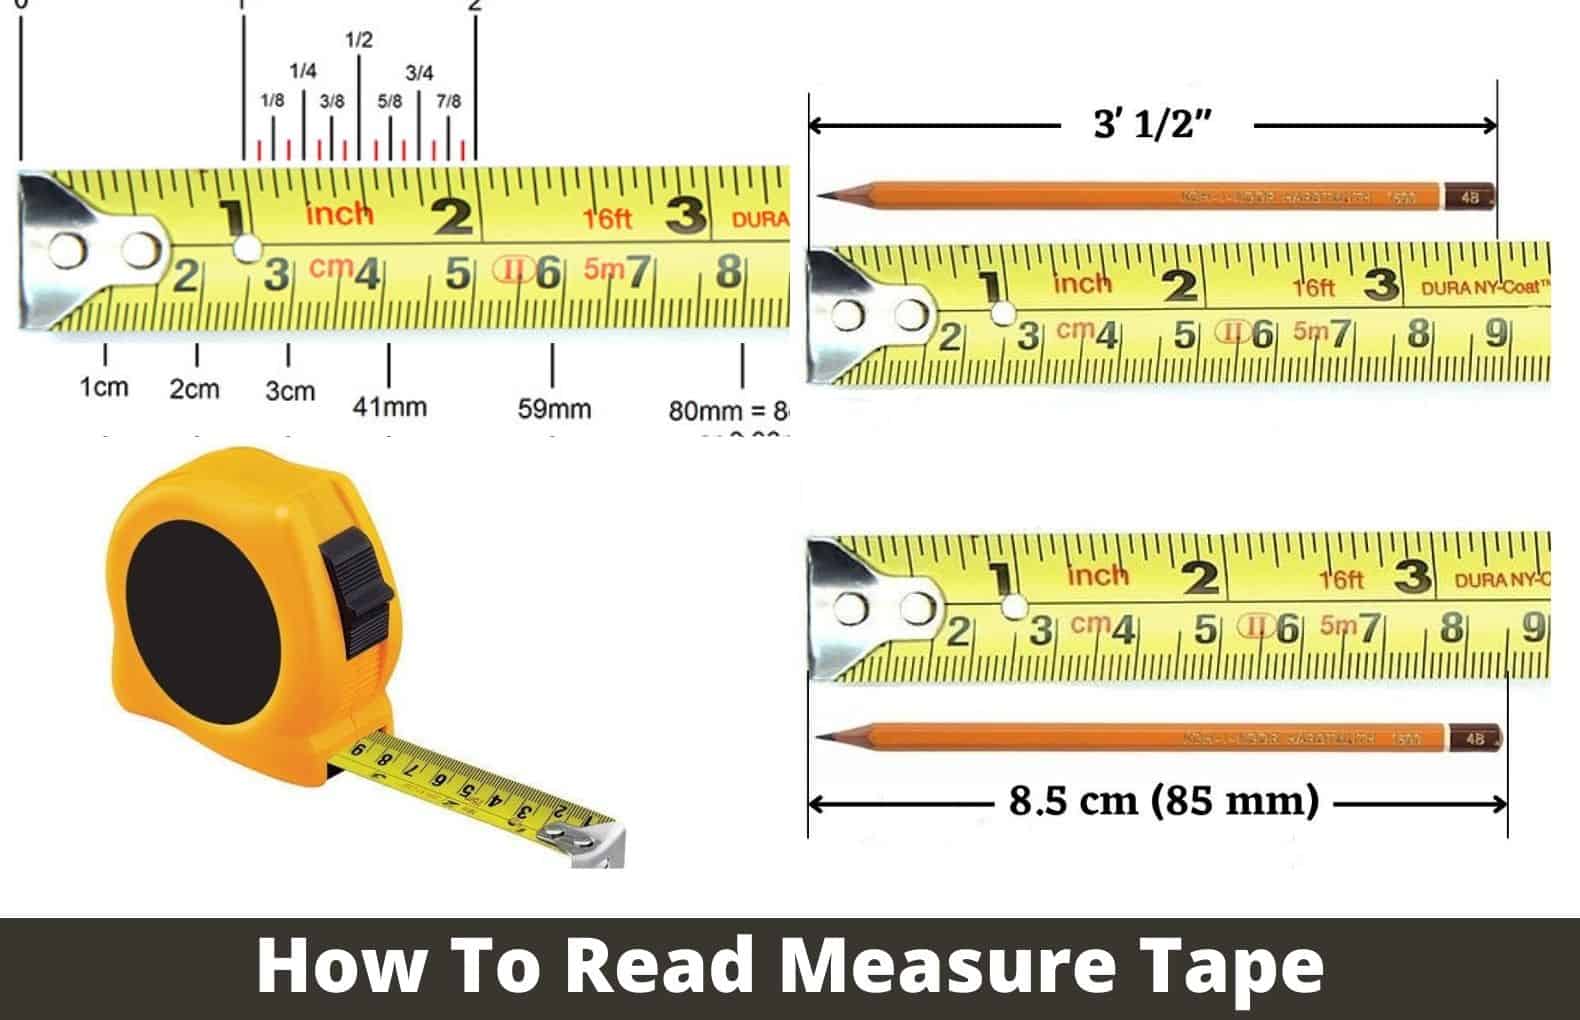
Navigating the Metric System (Centimeters and Millimeters)
The metric system is often considered simpler to read due to its base-10 nature. This guide covers everything from reading a tape measure in inches to metric systems like centimeters and millimeters. We'll also show you how to read measurements on a metric tape measure:
- Centimeters (cm): These are usually the numbered, larger lines (1, 2, 3, etc.). There are 10 millimeters in every centimeter.
- Millimeters (mm): The smaller, unnumbered lines between the centimeter marks. Each centimeter is divided into 10 millimeters.
To read a metric measurement, you'll find the last full centimeter mark, then count the number of millimeters past it. For example, if your measurement is past the 10 cm mark and lands on the 5th small line after it, that would be 10.5 cm or 105 mm.
How to Use a Tape Measure Like a Pro
Knowing the markings is only half the battle; proper usage is key to accurate results. Learn how to read a tape measure so you can master basic home repairs and DIY building projects. Read this guide to know how to use a measuring tape like a pro.
Getting Started: Proper Placement
Accuracy begins with correct placement. Start by placing the metal end of the tape measure flush against the edge of whatever you're measuring. This metal end, often called the "hook" or "tang," is designed to hook onto edges or butt against surfaces.
To read a measuring tape, line the zero mark up at the edge of the item you're measuring. This ensures your measurement starts precisely where it should.
Ensuring Accuracy
Once you've got your starting point, you need to ensure the tape is properly extended. Stretch the tape all the way across the item you're measuring. Try to keep the tape straight to avoid kinks or bends, which can lead to inaccurate readings. Pull the tape measure out until you've reached the other end of your item. For longer measurements, it can be helpful to have a second person hold the other end, or use the tape's locking mechanism to secure it in place.
When taking the reading, ensure you're looking directly down at the mark. Reading from an angle can introduce parallax error, causing your measurement to appear slightly off.
Advanced Tips & Tricks for Accurate Measuring
While it's fairly straightforward to read a tape measure, some tips and tricks can make your measuring quicker and more accurate. There are several tips and tricks worth knowing when it comes to reading a tape measure, and plus, we'll help you unlock tape measure features you might not even know about!
Understanding Special Marks
- Foot Marks: Most standard tapes have a special mark, such as an arrow, at each foot (every 12 inches). These are often highlighted in red or black to make them stand out.
- Stud Marks: On imperial tapes, you'll often see small black diamonds or triangles every 16 inches. These marks are incredibly useful for framing, as standard wall studs are typically spaced 16 inches on center.
The Hook's Play: Inside vs. Outside Measurements
The metal hook at the end of your tape measure is designed to move slightly. This isn't a defect; it's a clever feature! When you hook it over an edge for an "outside" measurement, the hook's thickness is included in the measurement. When you push it against an inside corner for an "inside" measurement, the hook slides in, and its thickness is excluded. This ensures accuracy regardless of how you're using the hook.
The Pencil Trick
When measuring a long distance, it can be hard to hold the tape perfectly still while marking. Instead of trying to mark directly at the end of the tape, try this: Extend the tape past your desired measurement, then use the tape measure itself as a straight edge to draw a line at your mark. This provides a more stable and accurate way to transfer your measurement.
Reading for Curves
Measuring around curves can be tricky. For larger curves, it's best to use a flexible cloth tape measure. For slight curves, you can often gently bend the metal tape measure, but be careful not to crease it. For internal curves, sometimes it's easier to take two straight measurements and then use a compass or flexible ruler for the curved section.
Choosing the Right Tape Measure
Learn how to read a tape measure, what the markings mean, how to use a tape measure, and how to choose the one that's right for you. Tape measures come in various lengths (e.g., 12 ft, 25 ft, 100 ft) and widths. A wider blade is generally stiffer and can extend further without kinking, which is great for solo work on longer measurements. Consider your typical projects: a short, compact tape is fine for small DIY, while a longer, more robust tape is essential for construction.
Final Summary
Reading a tape measure is a fundamental skill for many DIY projects, construction work, sewing, and more. Although it might seem straightforward, understanding the various markings and choosing the right techniques can significantly impact the accuracy and success of your work. By mastering how to decipher imperial fractions and metric units, properly positioning your tape, and utilizing smart tips and tricks, you can approach any project with confidence. Learn how to read a tape measure correctly so you can complete your project with confidence, ensuring every cut, every fit, and every build is precise.
How to Read a Tape Measure - Tips, Tricks & Mistakes to Avoid - The

Printable How To Read A Tape Measure
Reading A Tape Measure: Everything You Need To Know
