Master The Art Of Drawing Noses: A Step-by-Step Guide For All Skill Levels
Drawing the human face is one of the most rewarding aspects of art, but it also presents unique challenges. Among the essential parts of the human face that you need to learn is how to draw a nose. Often considered one of the trickiest facial features to capture accurately, mastering how to draw a nose is one of the trickiest parts of drawing a face. Perhaps it's the diversity of shapes we see every day that makes it difficult, or maybe it's to do with its subtle forms and complex shading.
Fortunately, you don't need to be a seasoned illustrator to draw a realistic nose. This comprehensive guide is designed to help you master this challenging facial feature. Whether you're a beginner or looking to refine your skills, this tutorial will guide you. We've curated a step-by-step tutorial to draw a nose in easy steps, breaking down the process into manageable parts. You'll learn how to start your nose sketch with basic guidelines and then build upon them, ensuring every line, shade, and highlight is perfectly placed.
Why Drawing Noses Can Be Tricky (and How to Conquer It)
The nose, with its unique and often subtle contours, can indeed be daunting for artists. Due to its odd shape and shading, figuring out how to draw a realistic nose can prove challenging. Unlike eyes or lips, which often have clearer outlines, the nose relies heavily on light and shadow to define its form. This means that simply outlining it won't give you a realistic result. The good news is that the tricks for learning how to draw a nose are within this easy guide. The key is to simplify and understand its underlying structure.
In order to easily draw the nose, we need to take the structure and simplify it to its basic shapes. This approach, advocated by professional artists like Kelly, helps demystify the complex anatomy. By breaking the anatomy into smaller shapes, you can approach this important part of a face in just a few simple steps, making the entire process much more manageable and less intimidating.
The Foundation: Understanding Nose Anatomy and Basic Shapes
The first step in drawing a nose is to understand its anatomy. The human nose consists of several components, including the bridge, nostrils, tip, septum, and alar crease. While these terms might sound complicated, we can simplify them for drawing purposes. This tutorial gives you a basic look at the shapes and anatomy needed for drawing realistic noses.
Simplifying the Structure
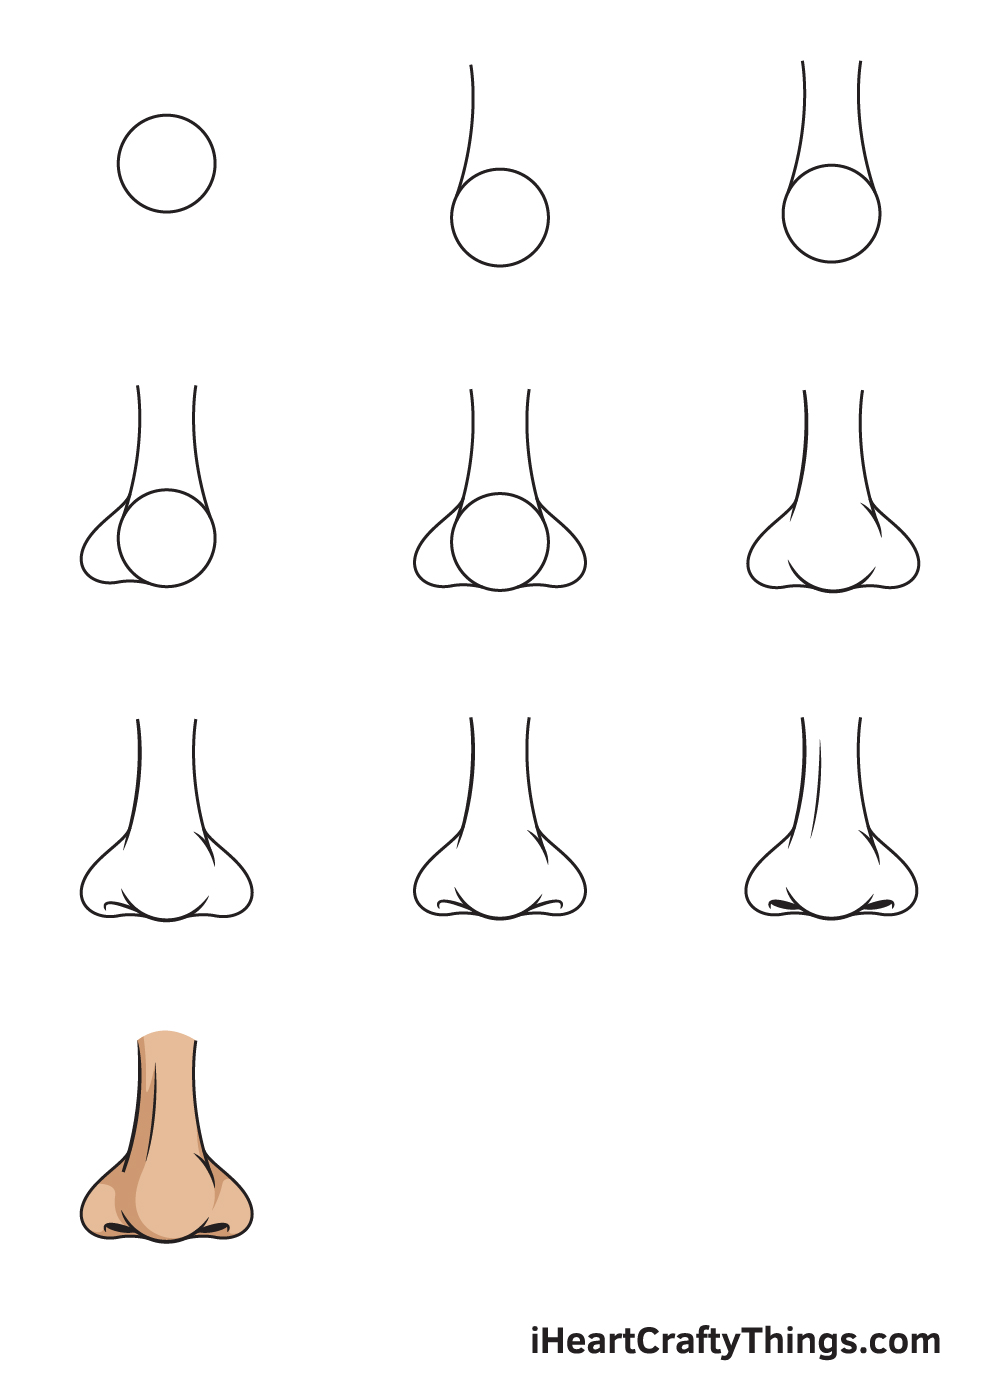
To begin, think of the nose not as a single object, but as a collection of simplified geometric forms. This is where the magic happens for beginners. Below is a diagram of a nose broken down into 3 separate parts, typically a sphere for the tip, a wedge for the bridge, and two smaller spheres or ovals for the nostrils. This simplification helps you plot out the overall form before diving into details.
Here’s how to start:
- The Sphere for the Tip: Begin by sketching a light circle or sphere to represent the general volume and placement of the nose's tip. This will be your primary anchor point.
- The Bridge: From the top of your sphere, extend two lines upwards to form the bridge of the nose. Think of this as a simple rectangular or trapezoidal prism.
- The Nostrils: On either side of the bottom of your sphere, sketch two smaller ovals or teardrop shapes for the nostrils. These don't need to be perfect at this stage.
This initial breakdown into basic shapes is crucial. It provides a solid foundation that you can build upon, making drawing this tricky facial feature much easier. You can learn how to draw this important part of a face in just a few simple steps, regardless of your current skill level.
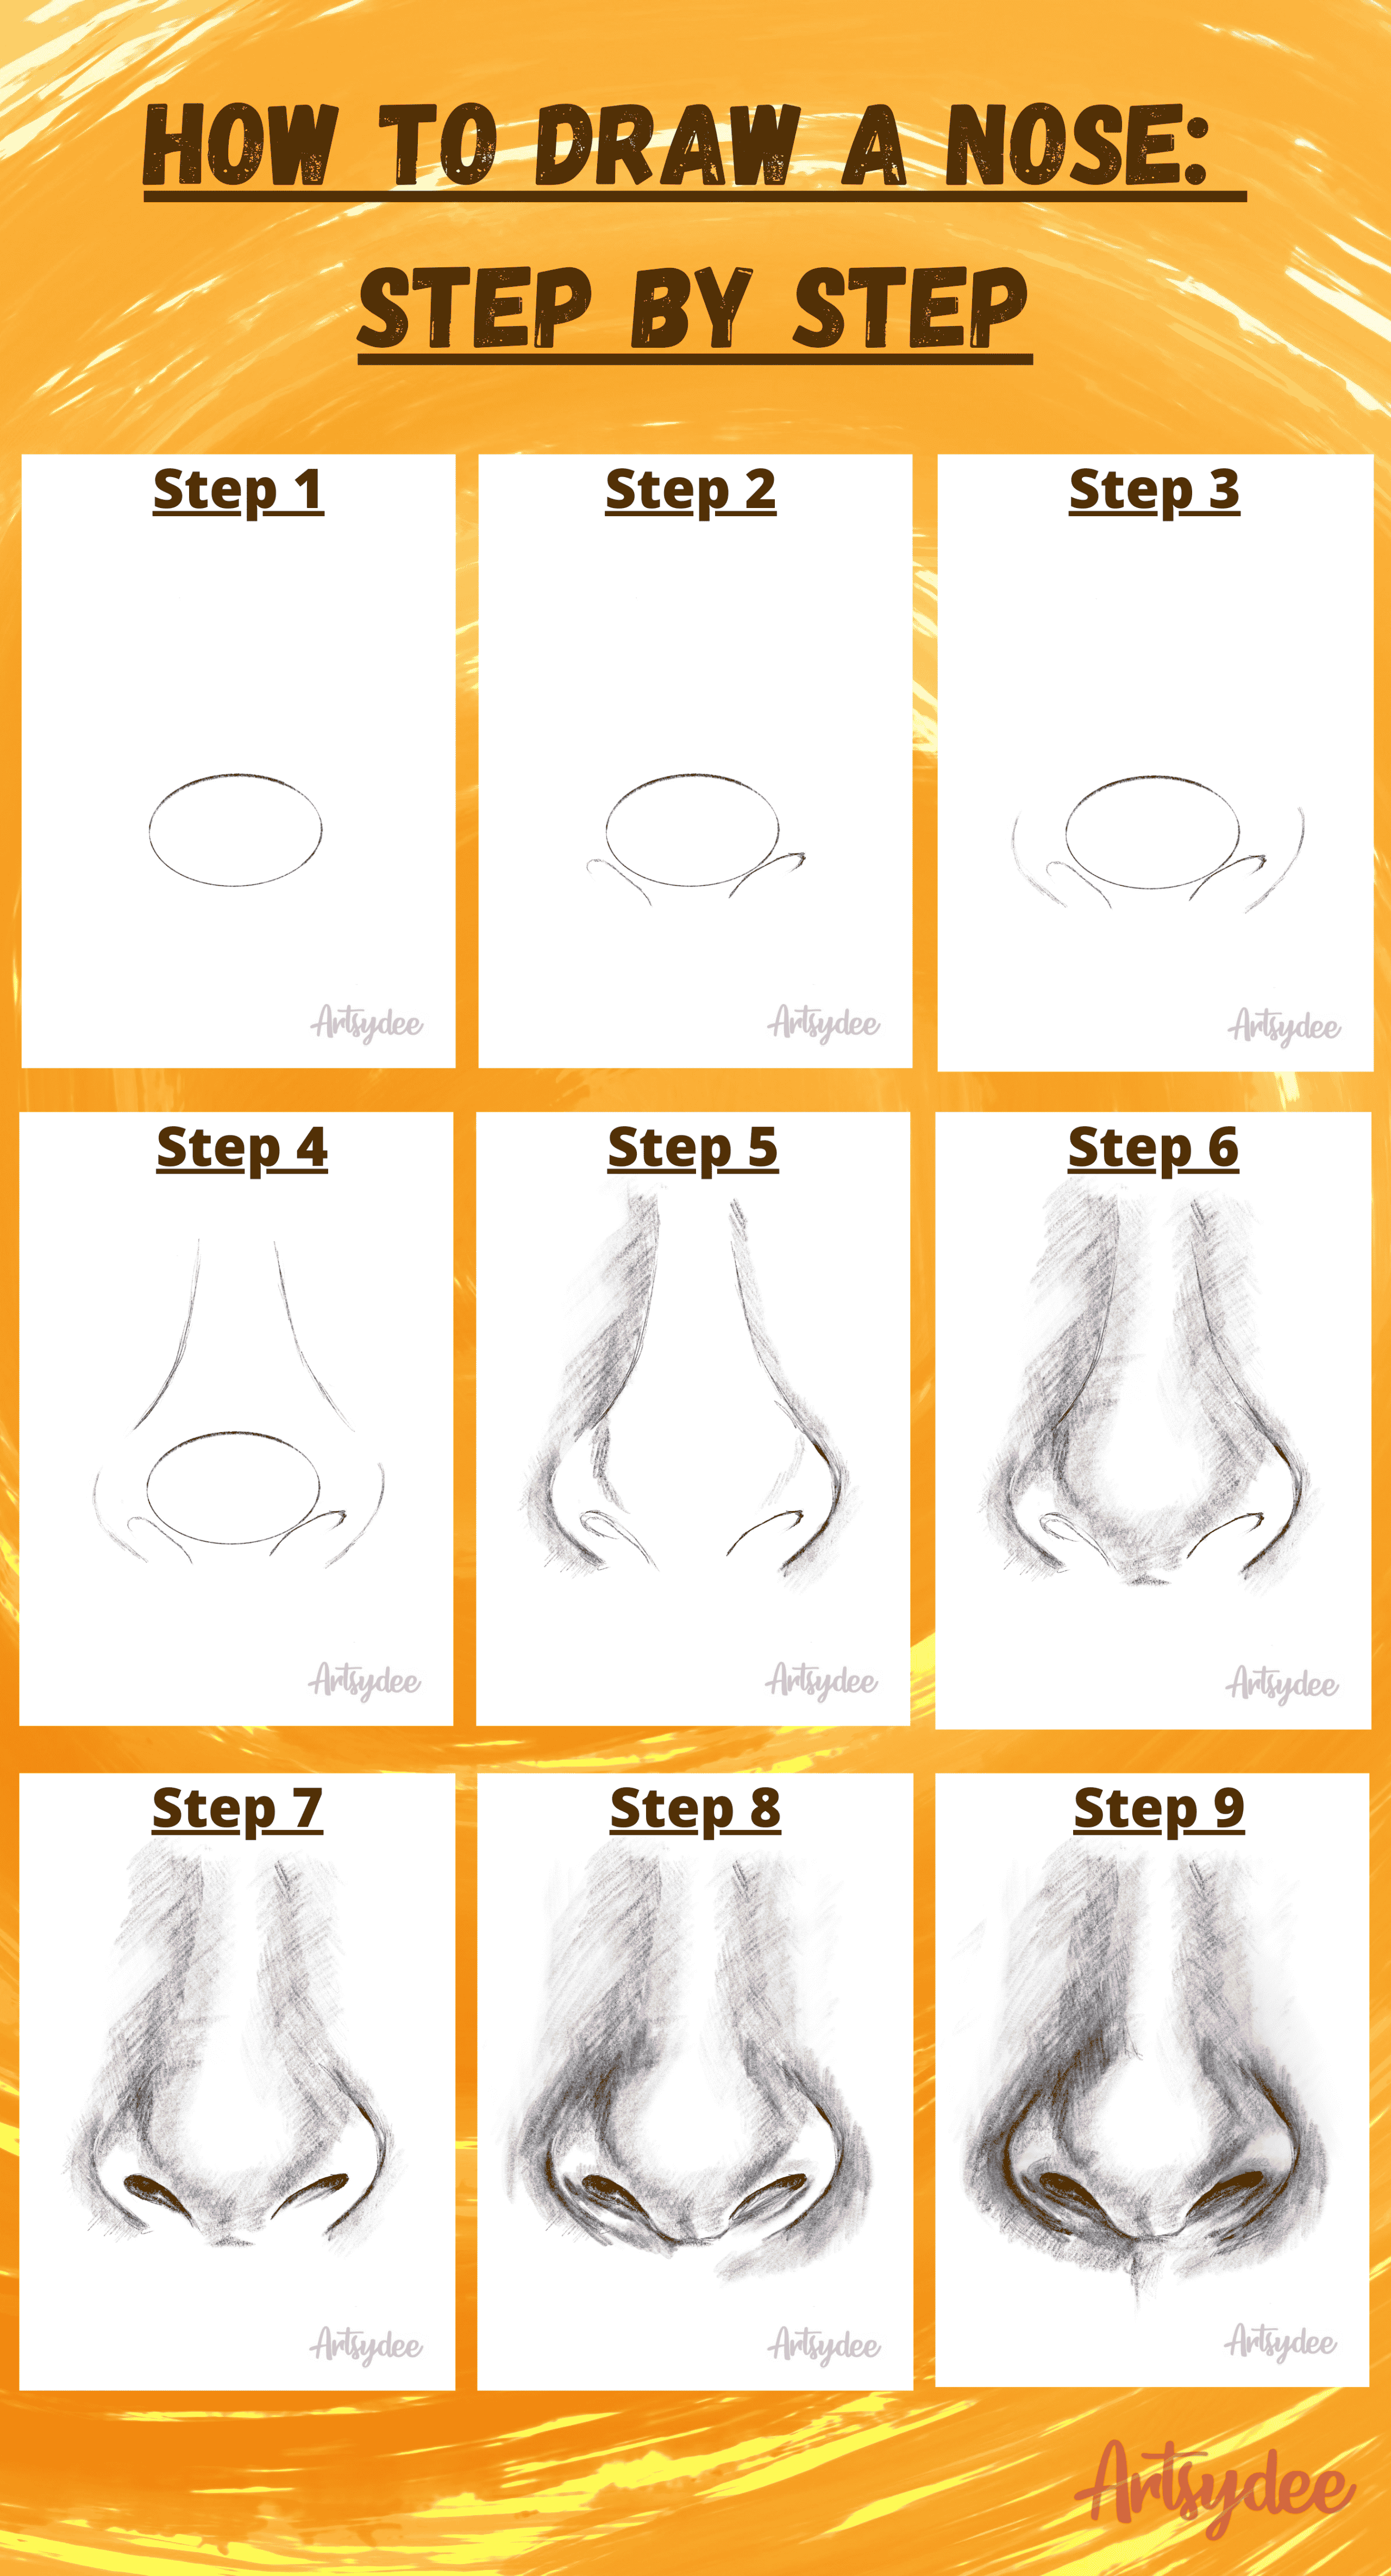
Step-by-Step: Drawing a Nose from the Front View
Drawing a nose from the front can be tricky, but with a systematic approach, it becomes much clearer. Here is a very simple step-by-step tutorial on how to draw a nose from the front view, showing you how to draw a realistic nose with a few simple pencil strokes.
- Start with Basic Guidelines: Begin by lightly sketching a vertical guideline down the center of where the nose will be. Then, draw a horizontal line where the tip of the nose will rest. You’ll learn how to start your nose sketch with 3 basic guidelines, including the width of the nose at the nostrils.
- Establish the Main Shapes: As discussed, draw a sphere for the tip of the nose, centered on your horizontal guideline. Then, lightly sketch two smaller spheres or ovals on either side for the wings of the nostrils. Connect the tip sphere to the brow area with two converging lines to form the bridge.
- Define the Nostrils and Septum: Once you have your basic shapes, it's time to refine the nostrils. Draw in the ‘c’ shape of the opening of the nostril on either side of the ellipse that forms the wing. The septum, the fleshy part between the nostrils, can be indicated with a soft curve underneath the tip sphere. By plotting out this shape, you will have a better idea of where the outer part of the nostril is.
- Refine the Form: Now, begin to erase your initial guidelines and connect the shapes with smoother, more natural lines. Think about the planes of the nose – the flat areas that catch light or fall into shadow. This tutorial breaks down how to draw a nose into four simple steps, including how to sketch the shape and build up shading.
- Add Initial Shading: Even at this early stage, you can start to think about light and shadow. Lightly shade the areas that would naturally be in shadow, such as underneath the tip and within the nostril openings. This will begin to give your nose a three-dimensional quality.
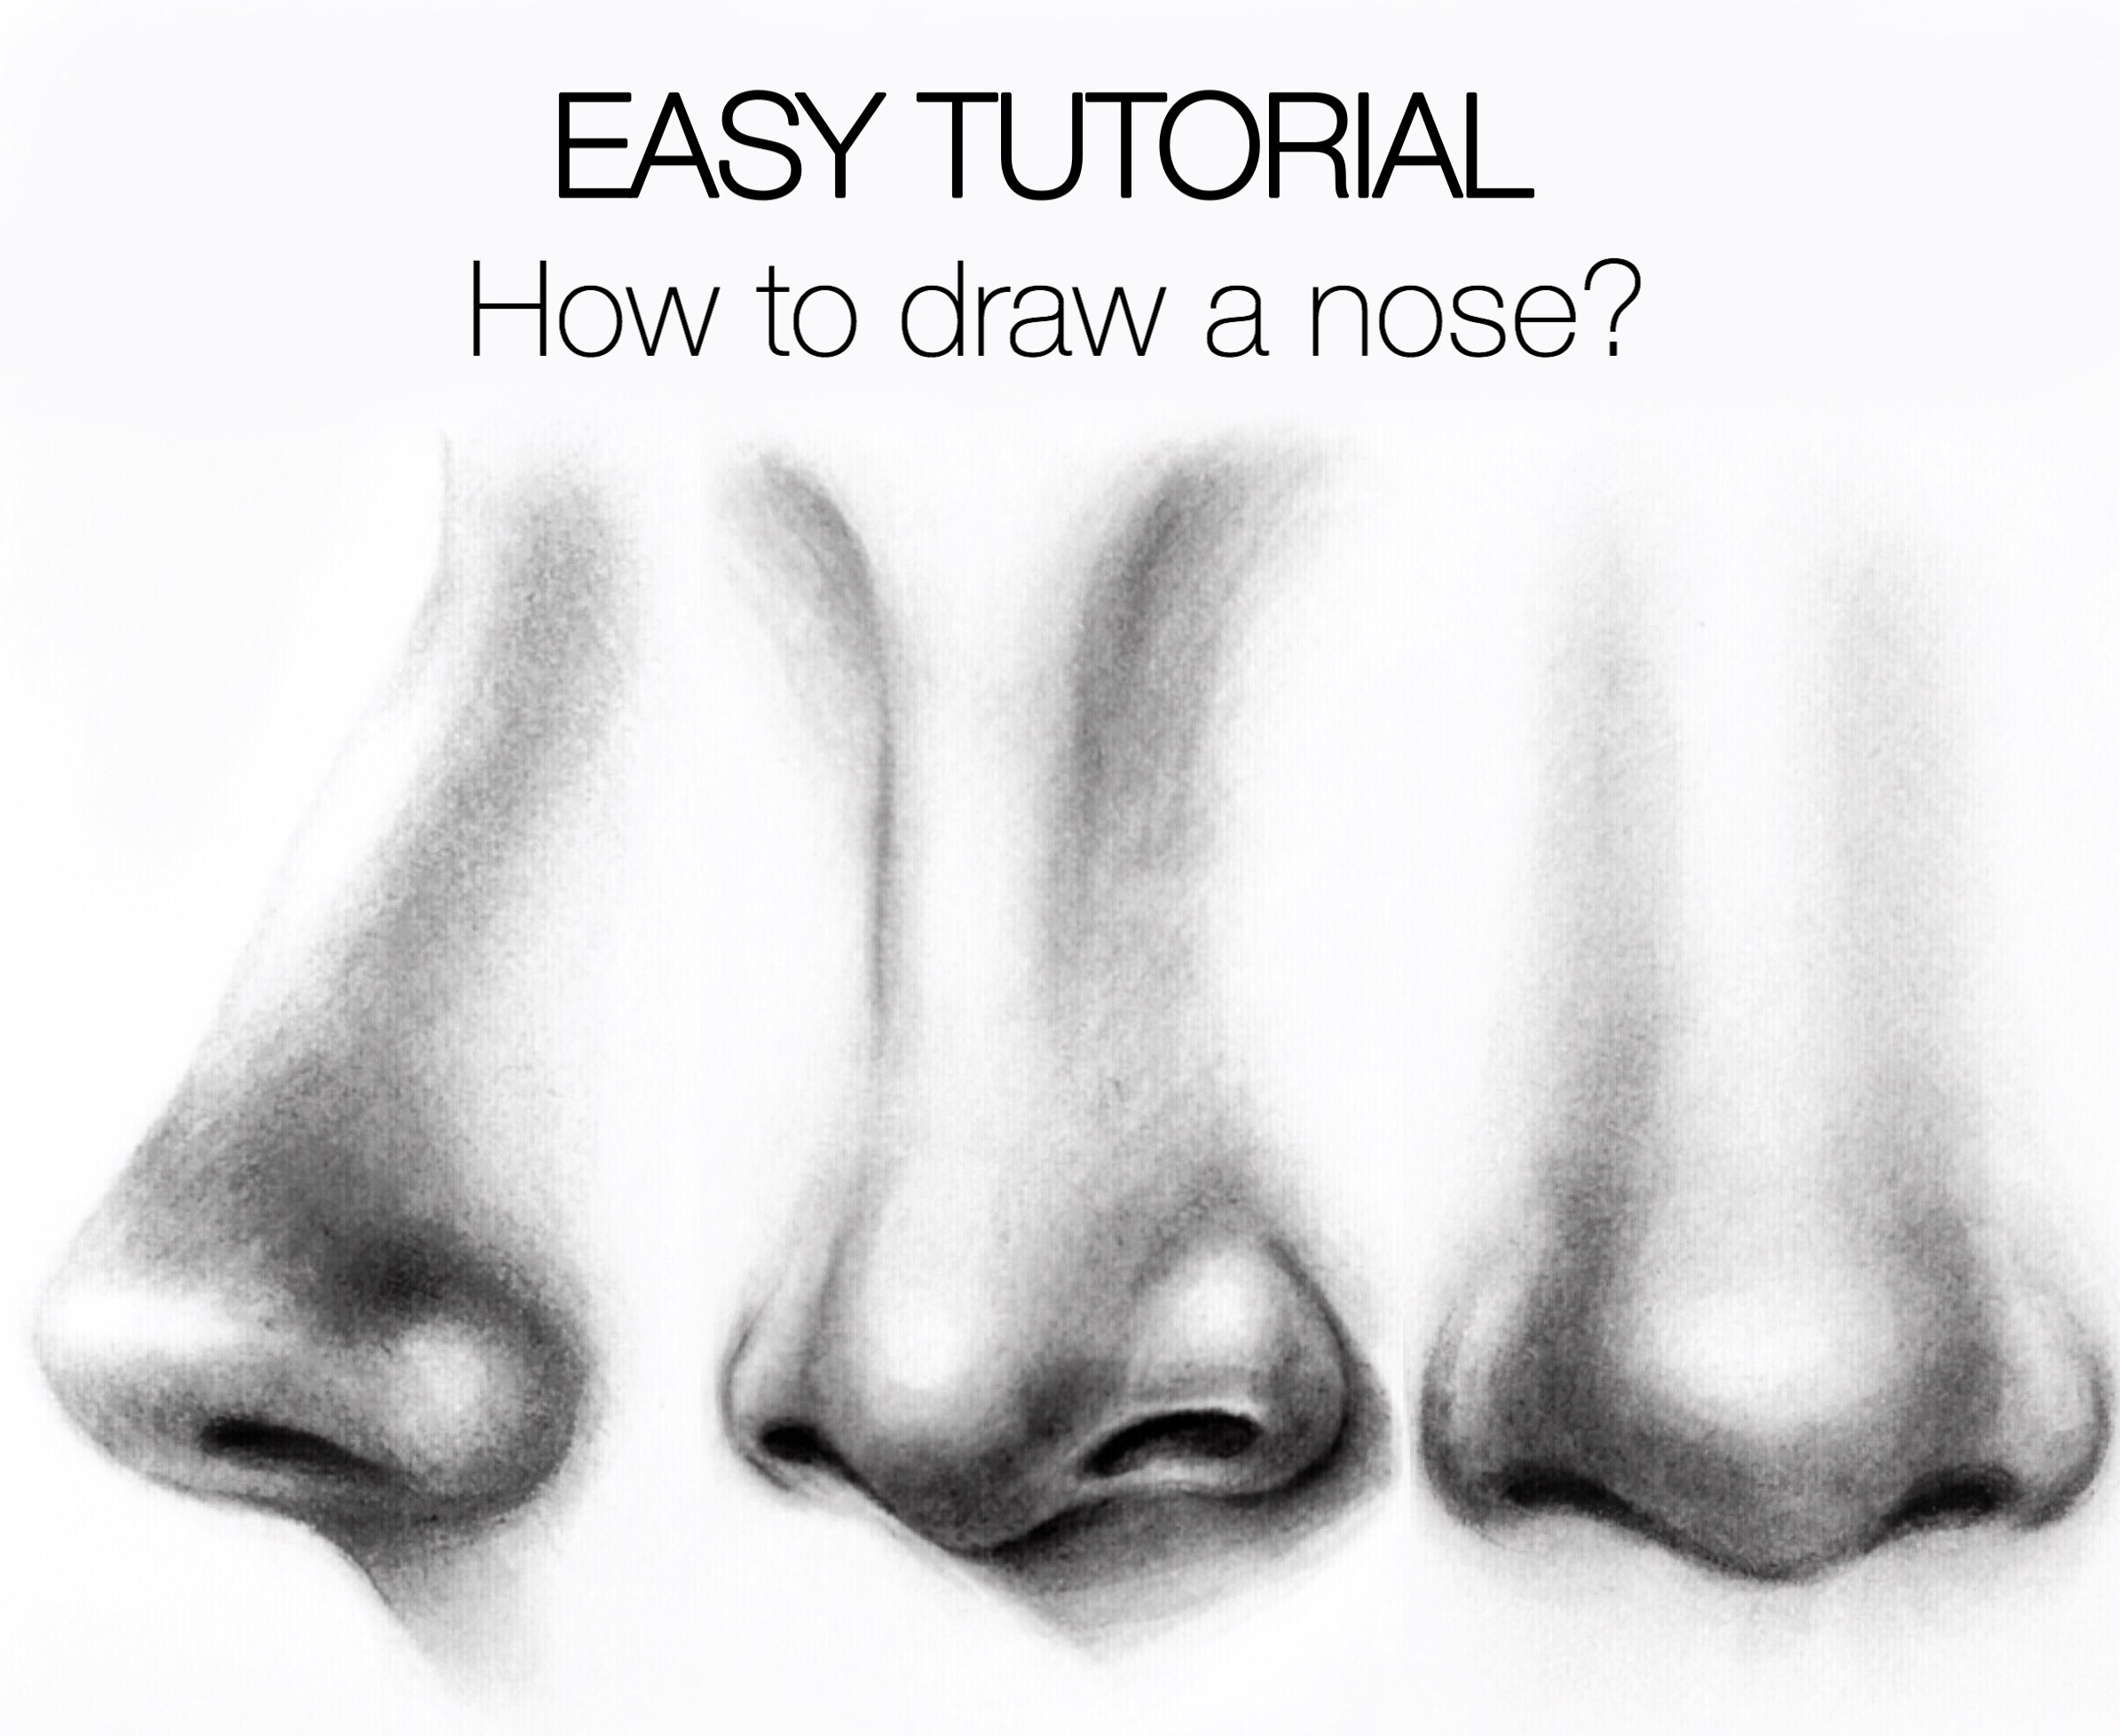
Mastering Different Angles: Profile and Three-Quarter Views
This article covers how to draw a nose from the front, at an angle, and in profile to help you master this challenging facial feature. While the front view is a great starting point, a realistic portrait often requires drawing noses from any angle easily. The same principles of breaking down the anatomy into smaller shapes apply, but the perspective shifts.
- Profile View: When drawing a nose in profile, the emphasis shifts to the silhouette. You'll still start with a basic shape for the tip, but then you'll focus on the curve of the bridge, the distinct shape of the nostril opening, and the angle of the alar crease. Peter Jochems, among other artists, shows you how to draw a realistic nose in a simple way, focusing on these key profile elements.
- Three-Quarter View: This view combines elements of both the front and profile. One side of the nose will appear more foreshortened, while the other will be more visible. It's crucial to pay attention to how the basic shapes overlap and recede in space. Learn how to draw a nose and improve your art skills with this fun video course from Sycra Yasin, which shows you how to draw noses from any angle easily.
Bringing Your Nose to Life: Shading and Realism
Once you have the basic structure down, the real magic happens with shading. This is where you transform your lines into a three-dimensional form that breathes life on paper. Need help drawing a realistic nose? This tutorial will guide you. We will explore how lighting and shadows define the nose's contours and give it depth.
To achieve a realistic nose, consider the light source. Is it coming from above, below, or the side? This will dictate where your highlights and shadows fall. Build up shading gradually, using smooth transitions between tones. The bridge, tip, and wings of the nose all have distinct planes that catch light differently. Follow along to ensure every line, shade, and highlight is perfectly placed. Learn how to draw a nose from start to finish, capturing every detail with our expert tips and techniques tailored for aspiring artists.
Expert Tips and Resources to Elevate Your Skills
Improving your drawing skills and getting inspired is an ongoing journey. To truly master the art of nose drawing, explore various resources. Learn how to create a variety of nose shapes using this method, as every nose is unique.
Many professional artists offer invaluable insights. Learn how to draw a nose by illustrator Raquel Arellano, who demonstrates how drawing noses in any style can be broken down into basic shapes, step by step with pictures. There are also numerous video tutorials available. We’ve taken the top 25 videos on how to draw a nose for any aspiring artist, providing a wealth of visual learning opportunities. Learn how to draw a nose in this ultimate guide that features video tutorials and images, from basic anatomy to intricate details, learn to draw noses realistically or stylized.
Remember, practice is key. The more you draw noses, the more comfortable you'll become with their diverse forms and the subtle interplay of light and shadow. Don't be afraid to experiment and observe noses in real life to capture their unique characteristics.
Conclusion
Drawing a nose is an essential skill for any aspiring artist. While it might seem challenging at first, by simplifying the anatomy into basic shapes and following a step-by-step approach, you can learn how to draw a nose easy. This guide has shown you how to draw a nose step by step for beginners, covering everything from understanding the underlying structure and anatomy to mastering different angles and applying realistic shading.
By breaking down the complex into manageable parts, focusing on basic shapes, and understanding how light interacts with the form, you can confidently draw realistic noses. Whether you're an amateur sketch artist or a seasoned illustrator, the ability to capture the intricacies of this central facial feature will significantly improve your overall portrait drawing skills. Keep practicing, keep observing, and soon you'll be drawing noses that truly breathe life on paper.
How to Draw a Nose Step by Step | 9 Quick Steps to Draw a Realistic
Drawing Nose
How To Draw A Human Nose Easy
